
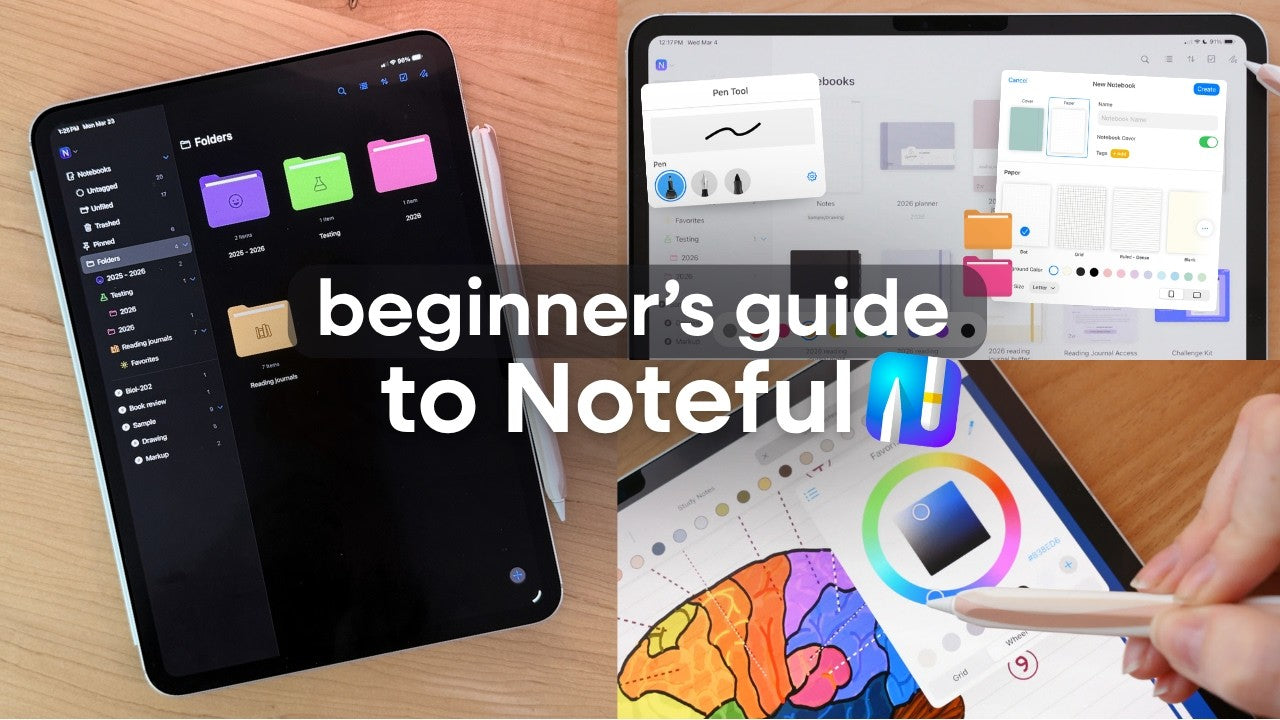
The ULTIMATE Noteful 2026 Tutorial: Everything You Need to Know

Noteful is one of the easiest note-taking apps to get comfortable with on iPad, especially if you're new to digital note-taking, digital planning, or both. It has a clean interface, a surprisingly deep toolset, and a few standout features that make everyday use feel smoother than in a lot of other apps.
If you want to organize notebooks, import custom planners, create links between pages, use layers, save stickers, record audio with synced notes, and customize your workspace so it actually fits how you work, this guide covers all of it.
Getting oriented on the Noteful home screen
When you open Noteful, the app is split into two main areas. On the left, you have the sidebar where your notebooks, folders, pinned files, tags, and trash live. On the right, you’ll see the notebooks and folders inside whichever section you currently have selected.
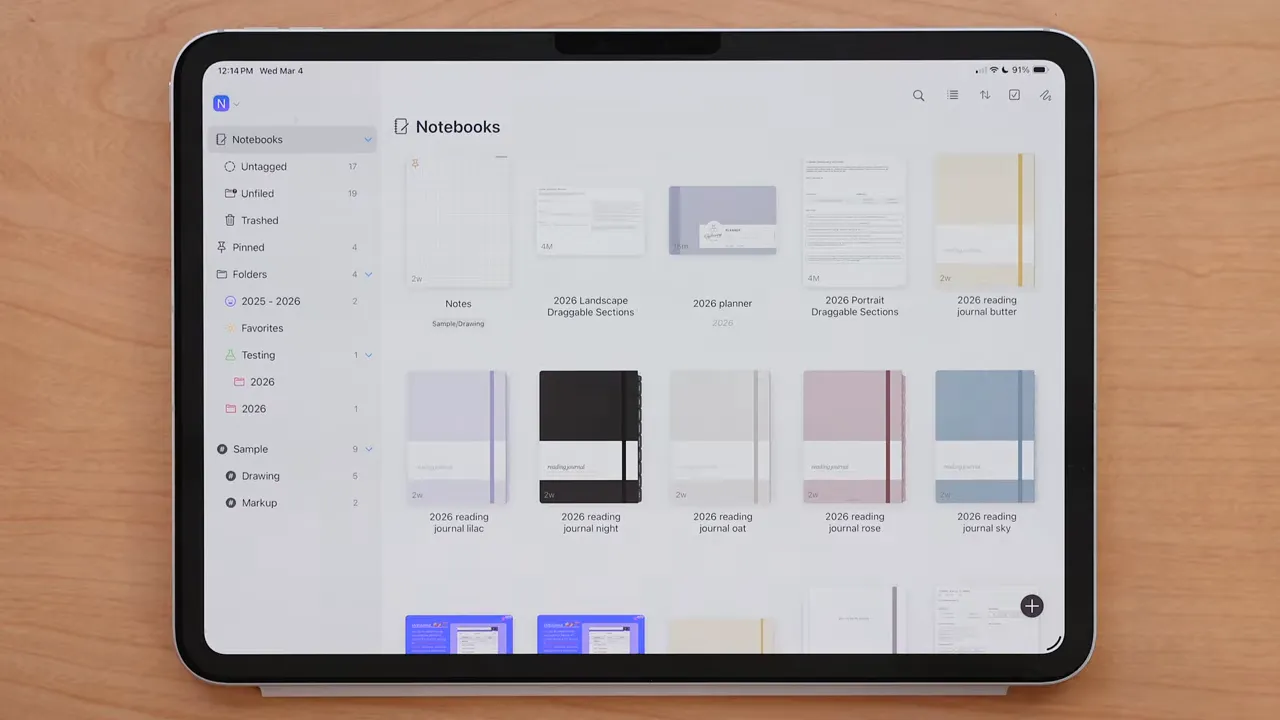
This layout makes it easy to switch between different ways of organizing your files. You can browse:
- Folders for more traditional organization
- Loose notebooks that aren’t inside folders
- Tags for cross-category sorting
- Pinned files for quick access to what you use most
In the top right of the main screen, you’ll also find a few important controls:
- Search to find notebooks quickly
- View toggle to switch between list view and a visual thumbnail layout
- Sort options by name, date modified, or date created
- Zoom controls to make file thumbnails larger or smaller
- Select to batch move, duplicate, share, or delete files
- Recent page shortcut to reopen the exact page where you last left off
That last one is especially helpful if you’re actively using a planner, class notebook, or project file and want to jump straight back into the right page without digging around.
Creating folders, notebooks, and quick templates
The plus icon is where most of your file creation starts. Depending on whether you’re in the notebooks section or folders section, you can:
- Create a new notebook
- Create a new folder
- Import a file
- Scan documents
- Use Quick Create
Quick Create is a really nice time-saver. If you tap the gear icon, you can preset your preferred notebook style, including:
- Paper style
- Paper size
- Paper color
So instead of choosing those settings every single time, you can create a notebook in one tap using your default setup.
There’s also a saved templates section available through the three-dot menu in that creation window. If you use certain templates often, you can import or export them and keep your setup consistent.
How folders work
To create a folder, go to the folders section first, tap the plus icon, and choose New Folder. You can give the folder a name, color, and icon.
Noteful also lets you nest folders inside other folders, which is great if you want multiple layers of organization. For example, you could have a main folder for Work, then subfolders for Meetings, Projects, and Reference.
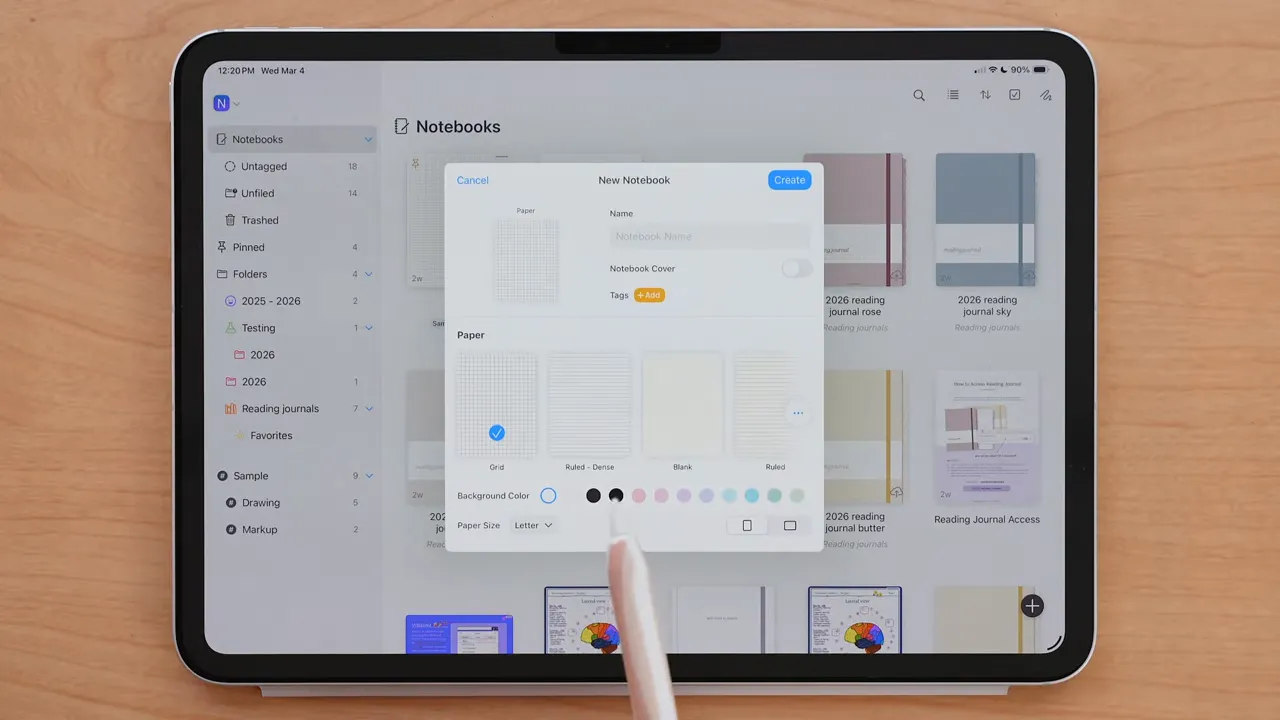
How notebooks work
Creating a notebook follows the same basic flow. Tap the plus icon, choose Notebook, then customize:
- Cover
- Paper size
- Paper color
- Template
- Name
- Tag
Once created, your notebook starts with one page by default. To add more pages, simply pull with your finger and more pages will continue to generate.
If you added a tag while creating the notebook, it will appear in the top-right area of the notebook. Tapping the notebook name also shows useful file details like:
- Its tags
- Where it’s stored
- Date created
- Date updated
- File size
From that same area, you can also open the notebook in a new window, close the tab, or delete the file.
Trash, pinned files, and pinned pages
Deleted files go into the Trash section in the sidebar. If you long-press a file there, you can either recover it or delete it permanently.
For quicker access, you can pin entire files so they appear under Pinned in the sidebar. Noteful also lets you pin individual pages inside a notebook, which is a feature I really like for important dashboard pages, reference spreads, or frequently used planning sections.
To pin a page, open the page, tap the three dots in the top-right corner, and choose Pin.
Importing custom digital planners and using hyperlinks
If you already have a custom digital planner or notebook PDF that you want to use, importing it is simple. Tap the plus icon, choose Import File, locate your file, and open it in Noteful.
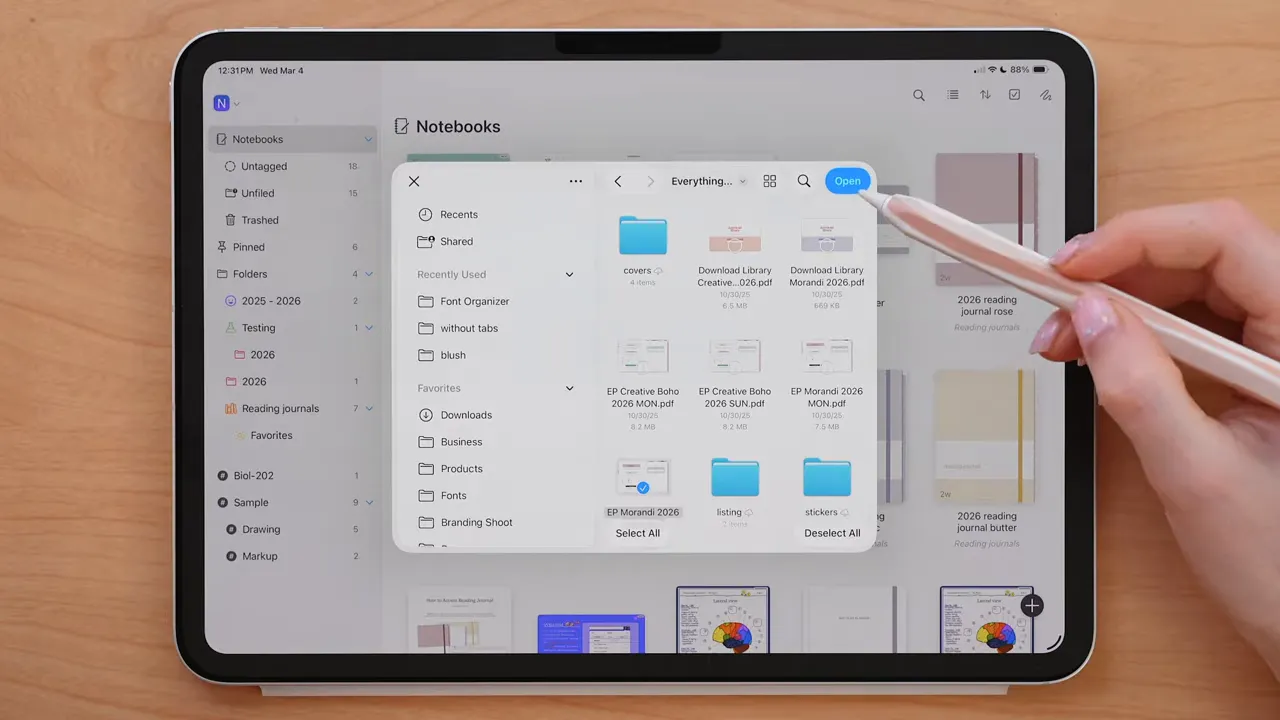
One of the nicest things here is how Noteful handles hyperlinks. In a lot of note-taking apps, you need to switch into a read-only mode before links inside a planner will work. Noteful skips that friction. You just press and hold on the linked area, and the hyperlink opens regardless of which tool is currently active.
If you use custom planners regularly, that alone makes the app feel much more seamless.
If you're looking for custom planner options, you can browse digital planners that are designed for this kind of workflow.
File settings, sharing, page controls, and internal links
When you have a notebook or imported file open, there are three important icons in the top-right corner:
- Layers
- View options
- More settings
Inside the file settings menu, you can do quite a lot:
- Change the page background
- Share the file
- Jump to a page number
- Resize or expand pages
- Copy a link to the current page
- Clear the page
- Delete the page
Sharing gives you several export options, including:
- Flattened PDF
- Native Noteful file
- Images
You can also choose the page range and whether to include things like tags or tape in the export.
One feature that feels especially powerful is the ability to copy a link to a page. You can paste that page link somewhere else in your notebook or planner, then long-press it later to jump directly there. That means you can build your own internal navigation system between notes, dashboards, indexes, project pages, or reference sections.
You can even edit the linked text and color, so it doesn’t have to stay in the default pasted style.
Gesture settings and editing preferences
Noteful gives you a good amount of control over how the app behaves while you write and navigate.
If you like drawing with your finger, you can turn that on. Under Gesture Settings, you can also customize:
- How undo and redo work
- Whether you use gestures at all
- Whether double-tap zoom is enabled
Under Document Editing, you can toggle options based on how you like to work. For example, if you don’t want the pull-to-add-page gesture, you can disable it. You can also hide page numbers or zoom percentage if you prefer a cleaner interface.
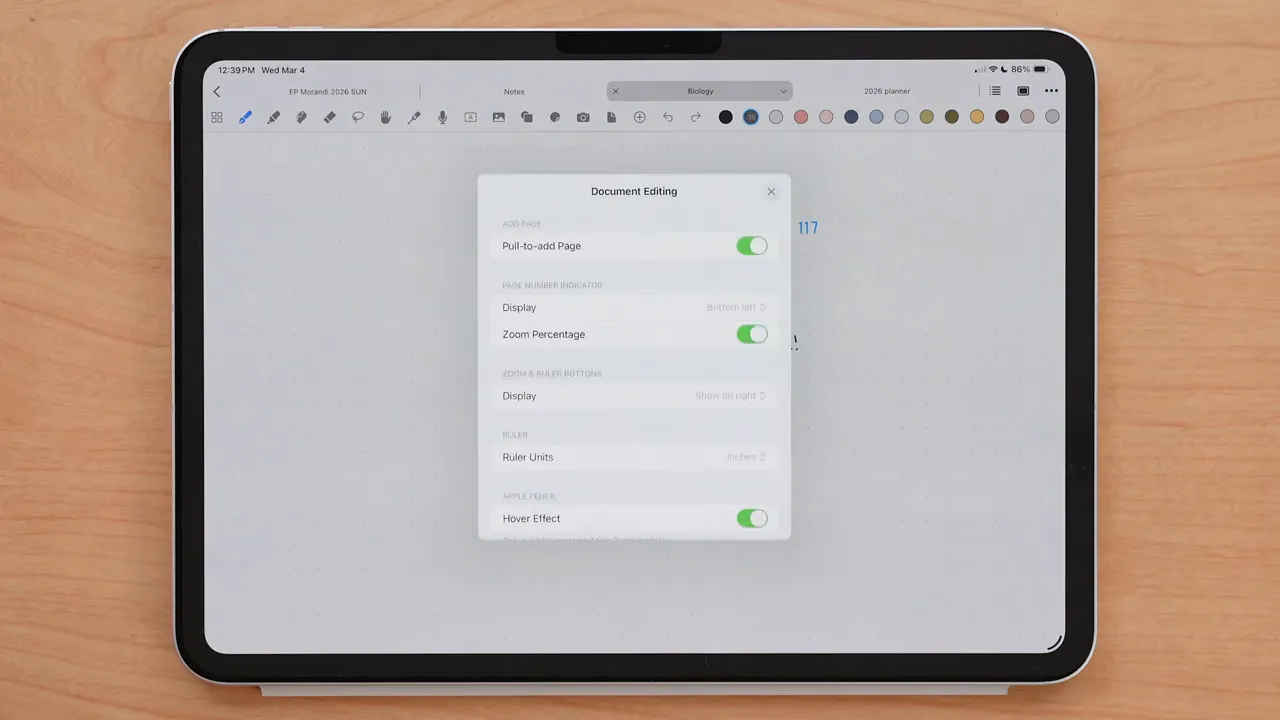
If page numbers or zoom percentage are visible, tapping them lets you either jump to a page by number or adjust zoom more directly.
There are also settings for:
- Apple Pencil hover effect, if your Pencil supports it
- Palm rejection
- Automatically opening imported documents
I’d absolutely recommend keeping hover effect and palm rejection turned on.
Customizing the toolbar and changing your page view
Noteful’s toolbar is customizable, which is great because most people only rely on a handful of tools regularly.
Inside Customize Toolbar, you can choose which tools appear and drag them into your preferred order. That way, the tools you use constantly are always one tap away, and everything else can stay tucked out of the way.
The view options menu also changes how documents are displayed across the app. You can choose:
- Vertical scrolling
- Horizontal scrolling
- Two-page view
One thing to keep in mind is that these settings apply app-wide. So if you prefer one notebook in horizontal view and another in two-page view, you’ll need to manually switch it each time. Noteful does not currently save those view preferences per file.
You can also change:
- Toolbar position: left, right, top, or bottom
- Tab bar position: top or bottom
- Whether the iPad stays awake while using Noteful
- Night mode appearance
- Status bar visibility
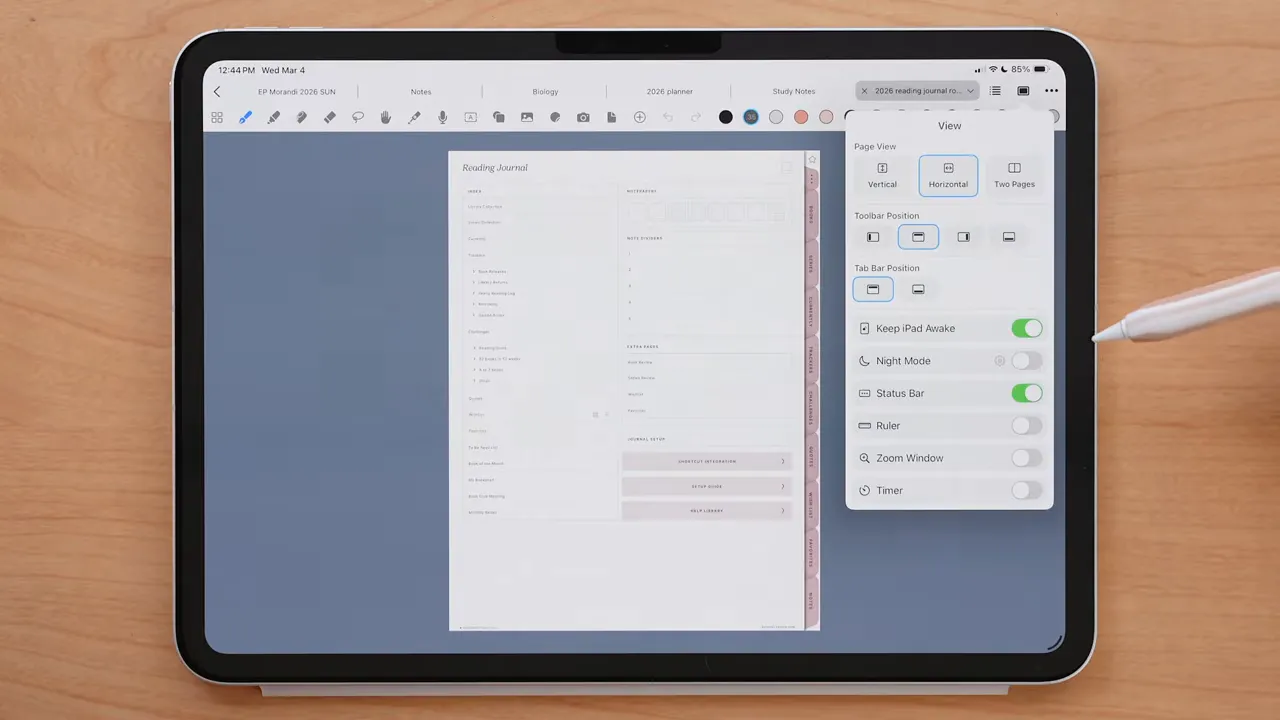
Night mode is especially helpful if you work in low light. There’s even a gear icon inside that mode where you can tweak the screen color and brightness feel for a more comfortable setup.
Using the zoom window, ruler, and timer
If you like writing neatly in smaller areas, the zoom feature is useful. You swipe with your finger to move the blue highlighted writing area, and whatever you write inside the zoom window appears on the page above it automatically.
You can show or hide the ruler and zoom window from the bottom-right corner. If you don’t use them often, you can also remove them from visibility entirely so the interface stays cleaner.
There’s also an optional timer that can appear on the tab bar. It includes both a stopwatch and a timer, which can be handy if you want to stay focused while note-taking, studying, or planning.
Managing pages with the thumbnail viewer
The first major toolbar icon is the thumbnail viewer, which shows all pages in your notebook or planner at once.
This is one of the easiest ways to manage pages, especially if you’re working with reusable templates.
From the thumbnail viewer, you can:
- Duplicate the current page
- Delete pages
- Cut, copy, and paste pages
- Add tags to pages
- Extract a page as a new notebook
- Rotate pages
- Share pages
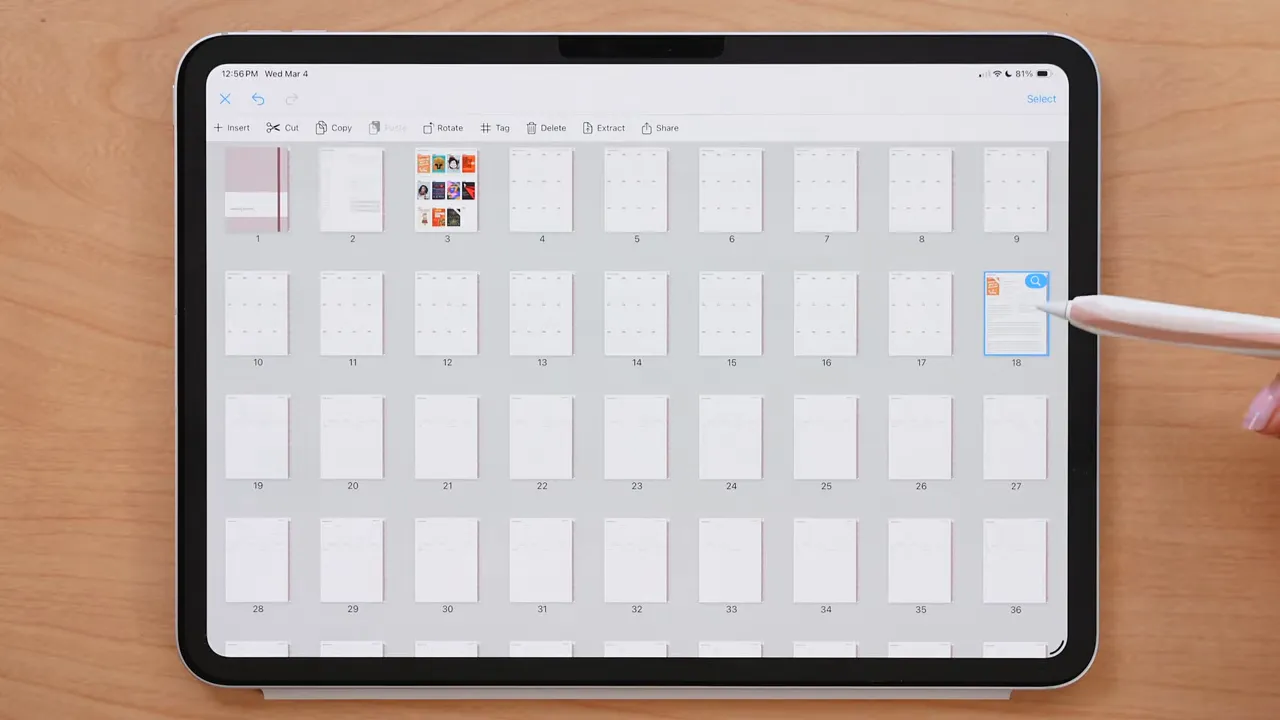
To duplicate a page, go to the thumbnail viewer, choose Insert, then select Current. That’s a simple way to reuse planning layouts, journaling prompts, or note templates without recreating them each time.
Pen tool, colors, custom pen styles, and Scribble
The pen tool is where a lot of people spend most of their time, and Noteful gives you a solid amount of control here.
You can choose from three pen types:
- Ball pen
- Fountain pen
- Brush pen
You can also adjust nib size and open the settings for options like:
- Hold to create shapes
- Scribble to erase
- Stroke delay
- Stroke sensitivity
- Motion smoothing
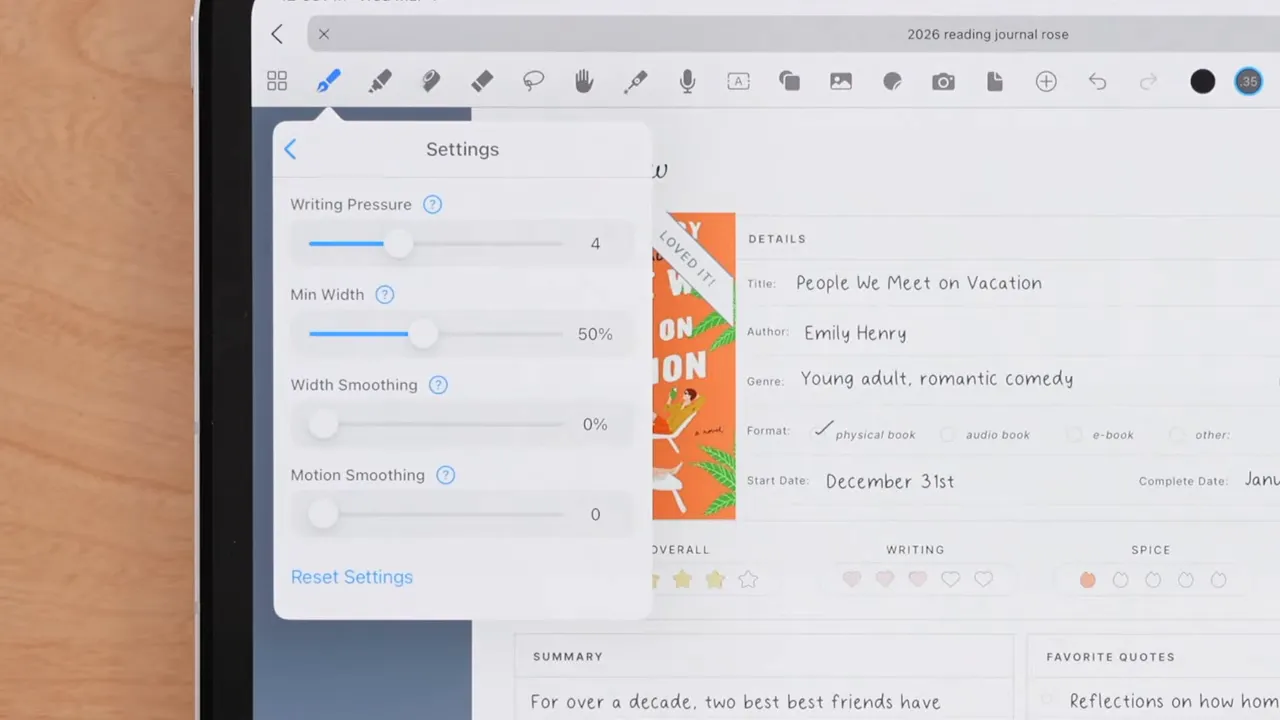
Motion smoothing is especially useful if your handwriting or drawn lines tend to look shaky. It helps remove some of the wobble from your strokes.
Color customization is also very flexible. You can select from existing toolbar colors or add new ones using:
- A color wheel
- A color grid
- A hex value
One of the best parts of this system is that toolbar colors can also store custom styles. That means you’re not just saving a color. You can save a whole writing preset, including:
- Pen type
- Nib size
- Stroke style
- Color
So if you always write headings in a black brush pen and body text in a finer ball pen, you can build those presets right into the toolbar and switch between them instantly.
How Scribble works in Noteful
Noteful also works with Apple Pencil Scribble, but you need to make sure Scribble is enabled in your iPad settings first under Apple Pencil.
Once enabled, use the Text tool, tap where you want to write, and write by hand with your Apple Pencil. Your handwriting is automatically converted into typed text using the selected font.
Scribble also supports some useful iPad-wide editing gestures, like:
- Scribbling over text to erase it
- Drawing a line between words or letters to add a space
It’s a nice middle ground if you like handwriting but want the cleaner finished look of typed text.
Text tool and reusable text styles
The text tool lets you type or use Scribble, then adjust the text box and formatting after the fact.
You can resize text by selecting it and adjusting the text box bounds. You can also edit formatting through the bottom text toolbar, including font, size, and other text settings.
Tapping selected text also gives you options like:
- Cut
- Copy
- Duplicate
- Delete
- Link
- Arrange front to back
- Move to a layer
If you use the same fonts and formatting often, Noteful lets you create multiple saved text styles. Open the text box, tap the double-A icon in the text toolbar, and create your preferred presets.
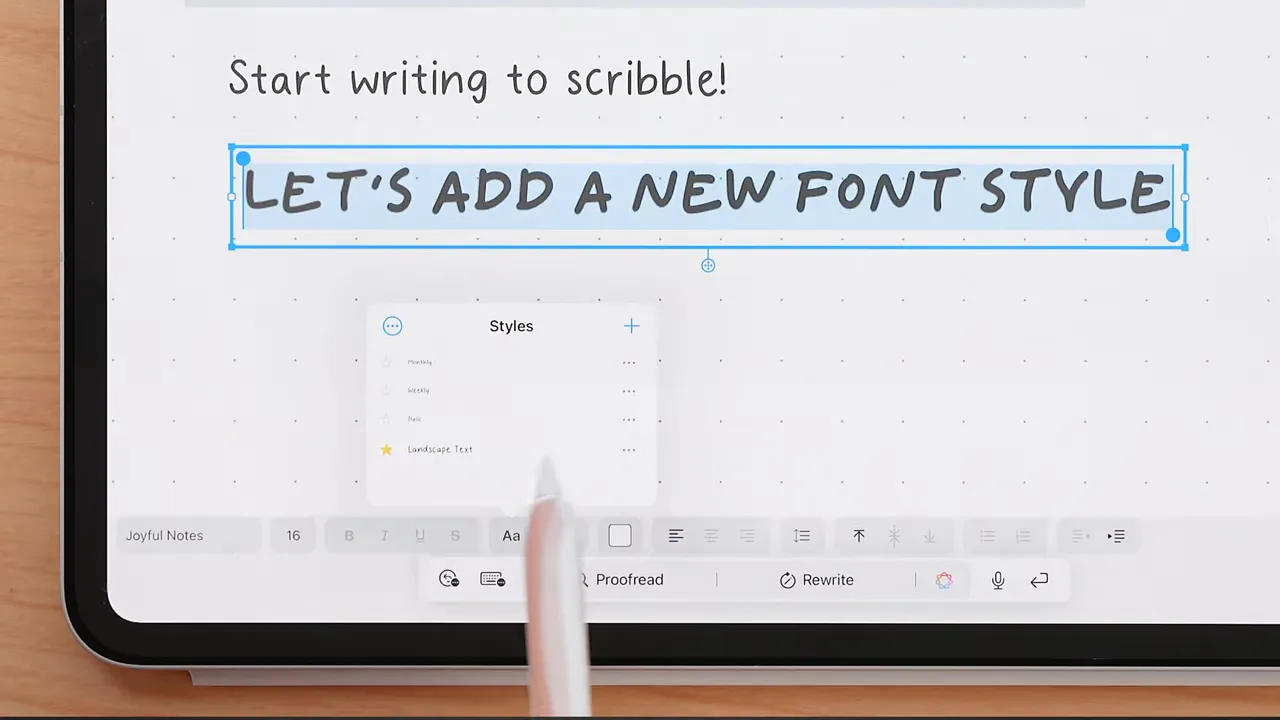
The starred style becomes your default. This is a really helpful setup if, for example, you want one style for headings, one for labels, and another for body text in your planner or notes.
Highlighter, tape tool, and eraser
The highlighter tool is straightforward. You can adjust nib size, choose colors, and decide whether the highlighter should draw straight lines automatically.
Hidden under the highlighter tool, unless you place it directly in your toolbar, is the tape tool.
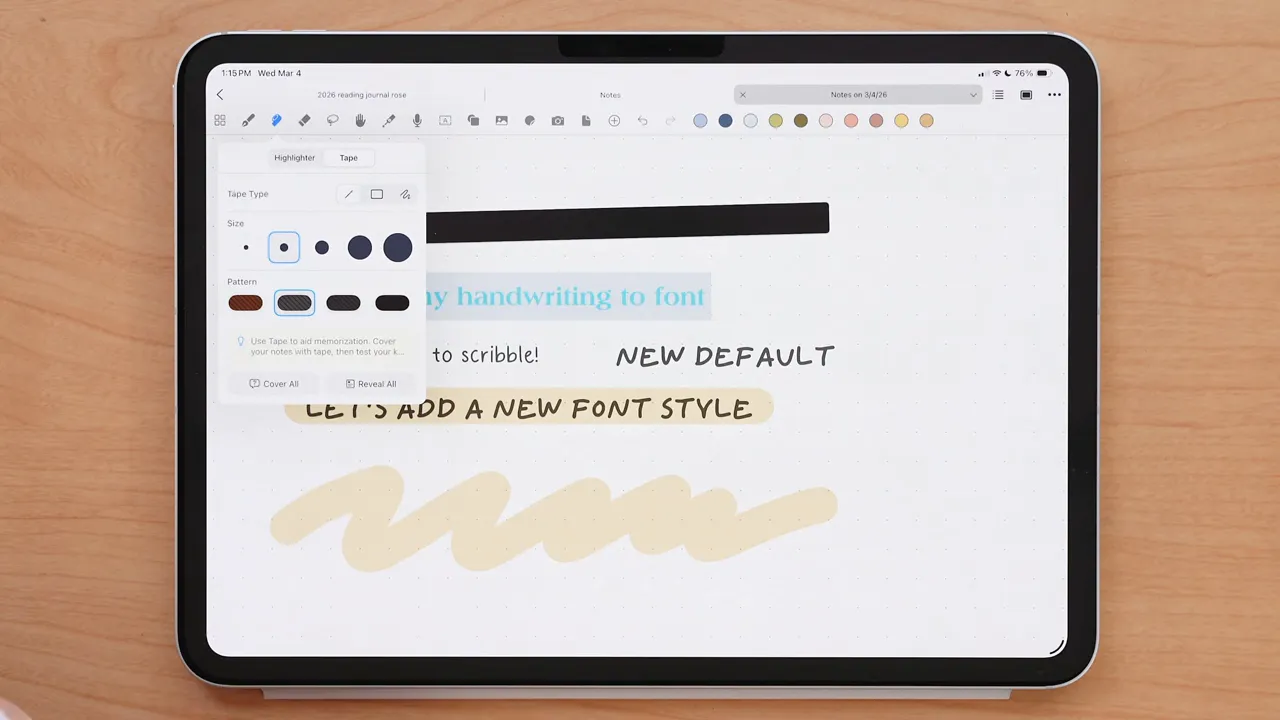
The tape tool is one of Noteful’s more unique features. You can use it decoratively in digital planning, but it’s also genuinely useful for studying. It lets you cover text or images so you can quiz yourself on concepts, definitions, or answers.
You can choose:
- Tape type
- Size
- Pattern
Tap the tape once to reveal what’s underneath. Tap again to hide it. If you’ve placed multiple pieces of tape on a page, you can use Reveal All to uncover everything at once, then Cover All to hide it again.
The eraser tool includes more options for how content gets erased, along with size controls. A practical setup is leaving erase shapes and erase tapes on while keeping the rest at their defaults unless you need something more specific.
The lasso tool: one of the most useful tools in the app
After the pen and text tools, the lasso tool is probably one of the most-used tools in Noteful.
It lets you select and move almost anything on the page, including:
- Handwriting
- Highlights
- Typed text
- Images
- Shapes
You can choose between a rectangular selection or a freehand selection. Freehand is often the more precise option, especially when you’re trying to grab one small item without disturbing nearby content.
Like the eraser, the lasso tool lets you decide what types of content it can pick up. You can leave everything turned on, or narrow it down when needed, such as selecting only text or only images.
Once you make a selection, the options include:
- Cut
- Copy
- Duplicate
- Delete
- Resize
- Style
- Opacity adjustment
- Screenshot
- Save to stickers
- Group elements
- Arrange
- Move to layer
That Save to stickers option becomes especially useful once you start building repeated decorative or functional elements for planning.
Read-only mode, presentation mode, and audio recording
The hand tool is essentially Noteful’s read-only mode. In this mode, you can swipe through pages with your Apple Pencil without accidentally writing on them.
It’s a bit less essential in Noteful than in some other apps because hyperlinks still require a long press regardless, but it’s still useful if you navigate a lot with your Pencil and want to avoid accidental marks.
There’s also a presentation tool, which can be helpful if you’re explaining something while screen sharing. It lets you draw temporary neon pointer marks that disappear after a few seconds, almost like a laser pointer effect.
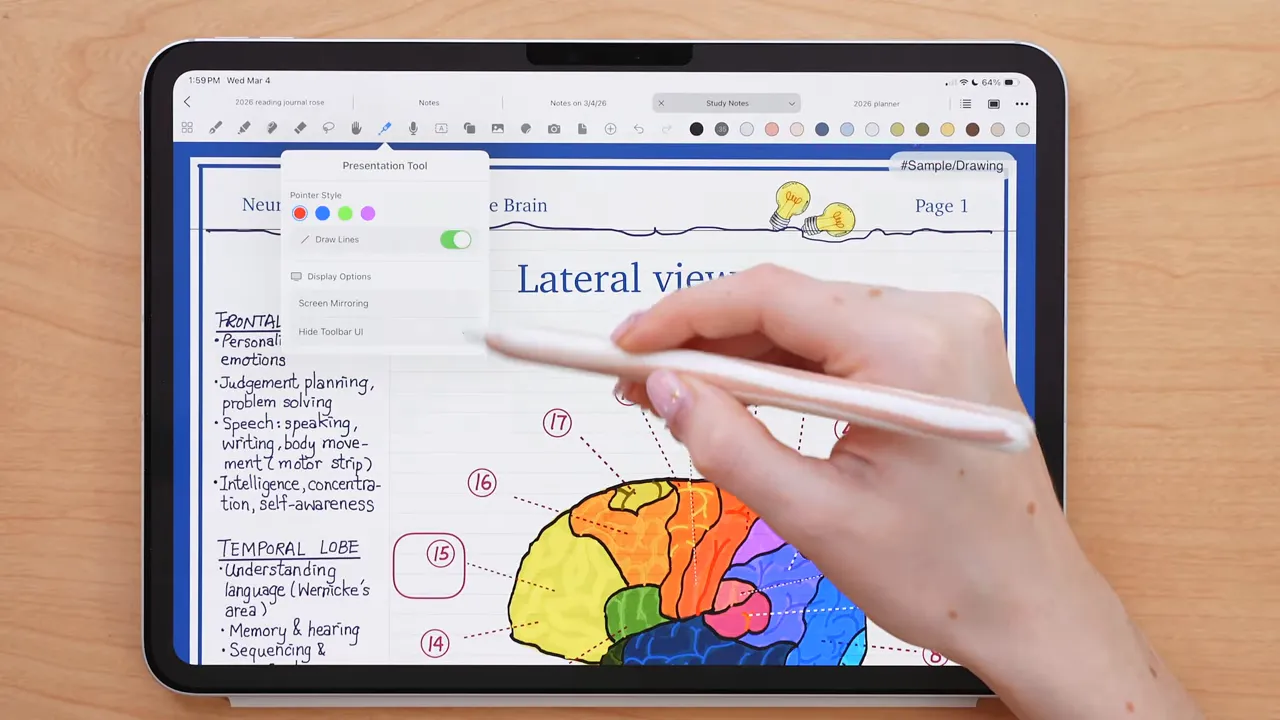
You can choose whether to present the screen exactly as you see it or hide the toolbar for a cleaner mirrored view.
The audio recording tool lets you record while taking notes, which is excellent for lectures, meetings, or any situation where you don’t want to miss details.
One of the best parts is that playback is synced with your notes. When you replay the recording, Noteful highlights the notes taken at that moment in real time. You can also:
- Adjust playback speed
- Store multiple recordings in one notebook
- Rename recordings
- Delete recordings
- Export recordings
Images, shapes, stickers, and quick camera access
Noteful’s image tool lets you insert photos from your library, and after adding one, you can crop it, flip it vertically or horizontally, or reset it if needed.
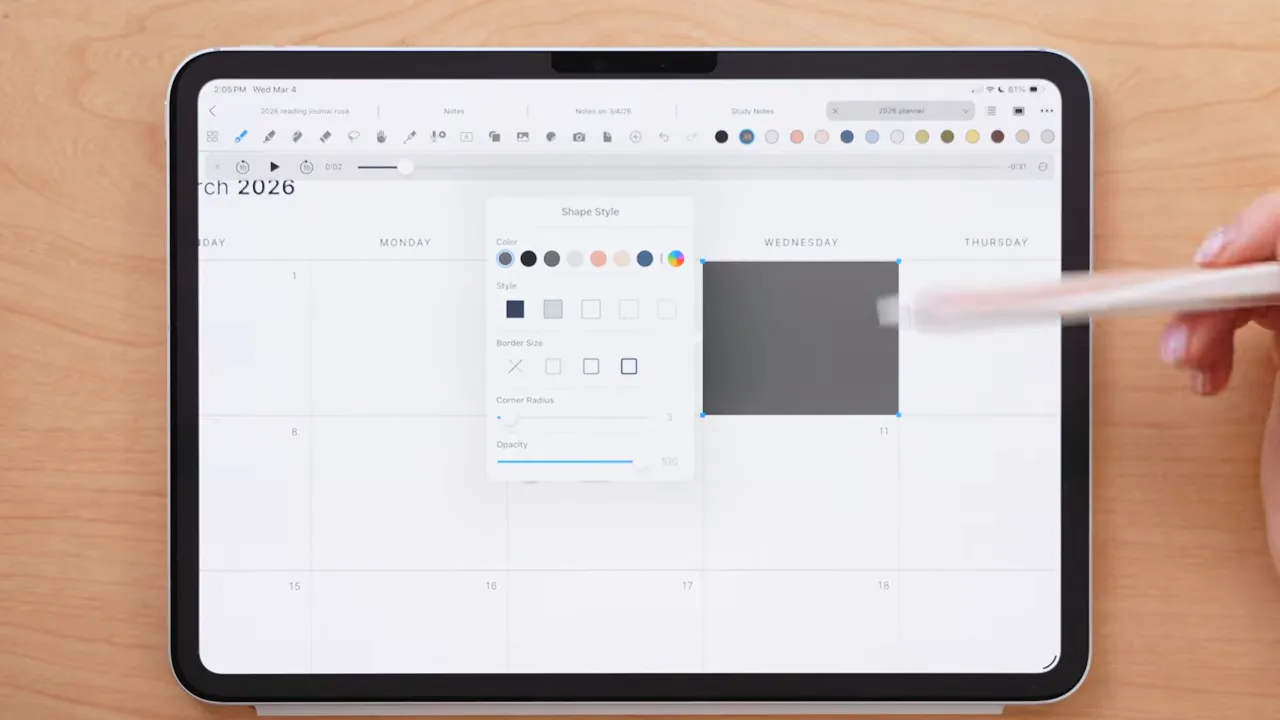
The shape tool is simple, but the styling options give it more flexibility. You can adjust:
- Shape style
- Corner radius
- Border size
- Color
The sticker feature is especially fun if you use digital planners, but it can also be practical. You can import sticker files, organize them into collections, rearrange them, rename collections, export collections, or delete them.
To create a sticker collection, tap the plus icon in the sticker panel and either:
- Create a collection manually and add stickers to it
- Import a file and build a collection from PNG stickers
At the bottom of the sticker panel, you’ll see your different sticker collections. You can edit them anytime to reorganize or remove individual items.
And this is where the lasso tool becomes even more useful: you can save almost anything as a sticker. Frequently used text, a doodle, a decorative label, a checklist icon, all of that can be selected with lasso, saved, and reused later.
If you also like creating a polished iPad writing setup, tools like an iPad screen protector or accessories from these Apple Pencil sleeves can complement that workflow nicely.
The camera icon gives you quick access to your iPad camera so you can snap and insert a photo directly into your notes without leaving the app.
The page icon inserts pages, and the plus icon in the toolbar acts as a shortcut hub for tools you decided not to keep permanently visible.
Undo, redo, and why toolbar minimalism helps
Undo and redo sit at the end of the toolbar, and you can also use gestures:
- Two-finger tap for undo
- Three-finger tap for redo
Those gestures can be customized or turned off entirely in settings.
A good rule here is not to overload your toolbar. Keep the tools you use most often visible, and let the plus menu handle the rest. Noteful feels better when your workspace is tailored to your actual habits instead of packed with every possible option.
How layers work in Noteful
Layers are one of the standout features in Noteful, especially for digital planning.
They work much like layers in design or illustration apps. You can place different content on separate layers within a notebook or planner, then show, hide, lock, merge, clear, or delete those layers as needed.
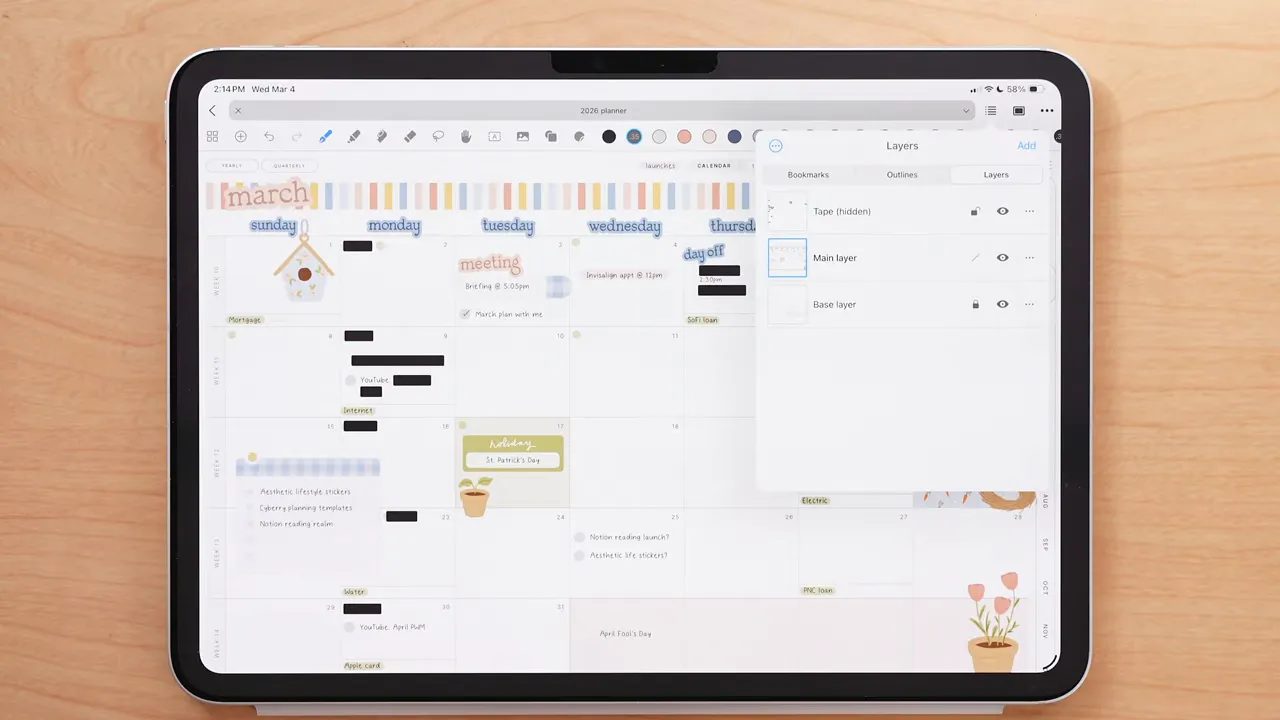
To add a layer, open the layers panel in the top-right and tap Add. Once created, you can:
- Rename the layer
- Merge it down with the layer below
- Clear its contents
- Delete it
- Toggle visibility with the eye icon
- Lock or unlock it
Noteful requires at least one layer to remain unlocked, which makes sense because the app needs somewhere for active editing to happen.
Anything on the topmost layer appears above content on lower layers. If a layer is locked, its contents can’t be moved, edited, or deleted until you unlock it.
A really practical setup for digital planning is using:
- A base layer for static design changes, templates, checklists, or structure you don’t want to disturb
- A main layer for writing, stickers, planning, and daily edits
That way, the foundation stays protected while you work freely on top of it.
If you accidentally delete a layer, the three-dot menu in the layers panel lets you access recently deleted layers. Those can be recovered or permanently removed, and deleted layers stay recoverable for 30 days.
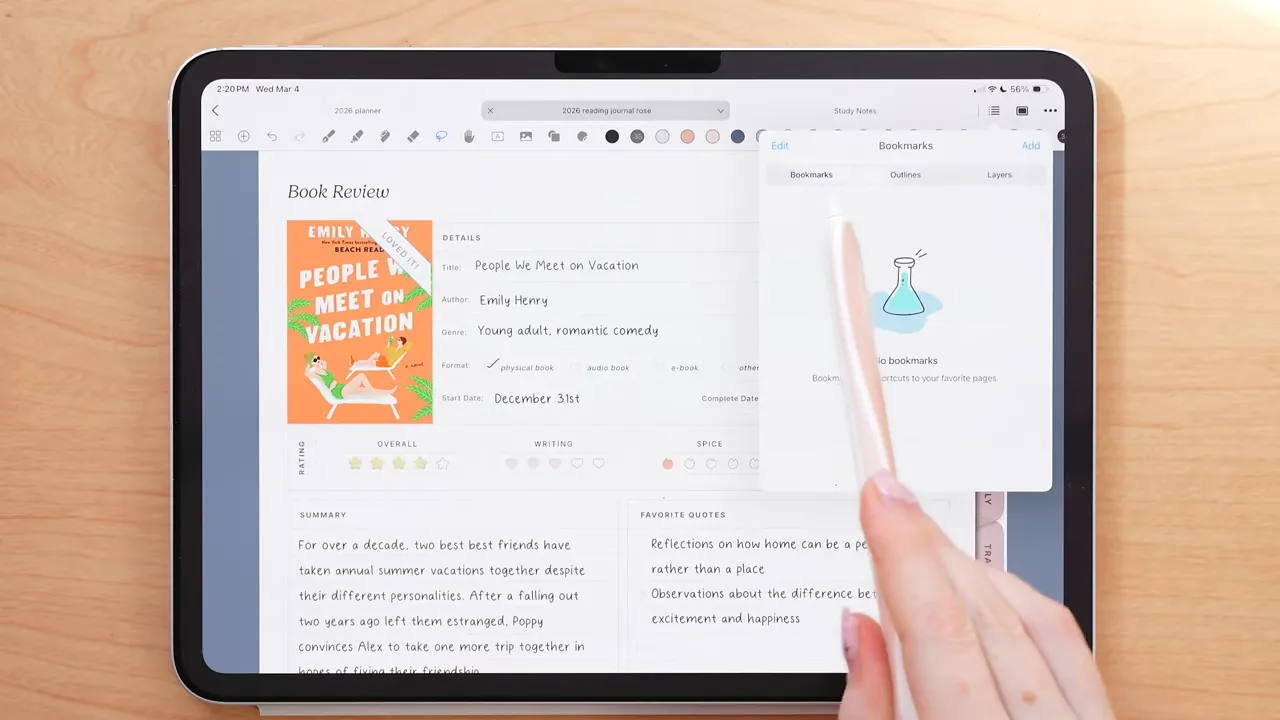
Bookmarks and outlines
Inside the same general top-right area, Noteful also includes Bookmarks and Outlines.
Bookmarks are the faster, simpler option. They let you save important pages for quick access. Just tap Add while on the page you want to bookmark, then rename or delete it later from the three-dot menu.
Outlines work more like a table of contents. You can add a title for a page and build a hierarchy that helps structure larger notebooks or planners.
If you use a notebook for class notes, research, or multi-section planning, outlines can make navigation much more manageable.
App settings, themes, iCloud sync, and Google Drive backup
If you tap the Noteful app icon from the main interface, you’ll open a broader settings area. This includes things like:
- App rating and feedback options
- Notebook templates
- Theme settings for the app and toolbar
- Document editing and gesture settings
- iCloud sync
- Data export
- Google Drive auto backup
- Recently deleted files
- App version and build number
iCloud sync automatically keeps copies of your documents updated across devices that have Noteful, and it also gives you some peace of mind if your iPad is ever lost or damaged.
There’s also an option to auto back up to Google Drive, and you can even exclude certain files from backup based on tags.
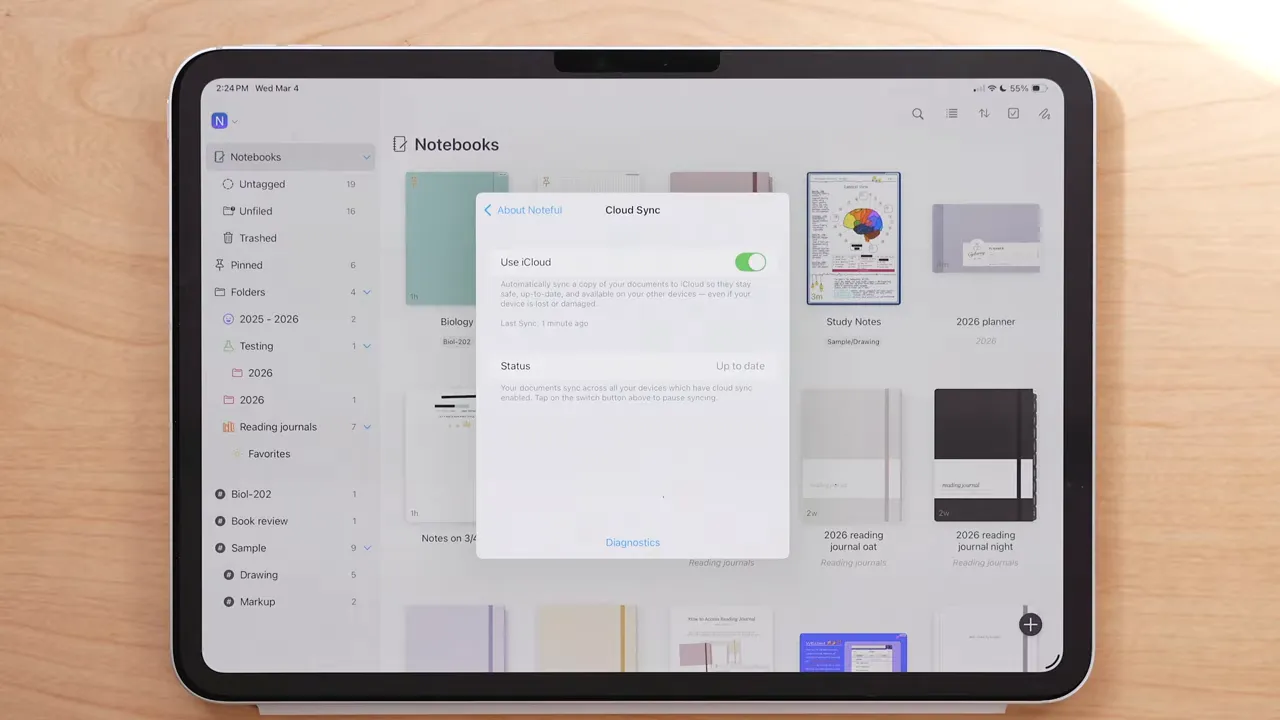
That syncing and backup functionality is part of Noteful Pro, which uses a one-time payment model of $4.99. Honestly, that’s incredibly fair for what the app offers, especially compared to subscription-heavy alternatives.
If you're building a wider digital productivity system beyond handwritten notes, you may also want to explore Notion templates that pair well with digital planning workflows.
Why Noteful is such a strong iPad note-taking app
Noteful does a really good job of staying approachable while still offering advanced features when you need them. The basics are easy to learn, but there’s plenty of depth once you start using layers, stickers, internal links, text styles, tape, audio syncing, and imported planners more intentionally.
Its biggest strengths are:
- Easy navigation for beginners
- Thoughtful organization with folders, tags, pinned files, bookmarks, and outlines
- Strong planner support with hyperlink-friendly importing and layers
- Useful customization for toolbar, gestures, text styles, and pen presets
- Affordable pricing with a one-time Pro purchase instead of an ongoing subscription
If you’re just getting started with digital notes on iPad, or you want a more flexible app for digital planning without paying a recurring fee, Noteful is very easy to recommend.
For more digital planning resources, notebooks, and tools, you can also explore the KDigitalStudio website.

Share:
Don’t Buy the Wrong Apple Pencil in 2026: Every Model Compared + the Best Alternatives
Best Prime Day 2026 Deals: iPad Essentials & Tech Picks