

There is truly nothing more important than carving out a space that you enjoy coming to to get work done, especially if you work from home like I do. When we bought our home in the summer, it was pretty clear that the room above the garage would end up serving as my studio office space. Compared to other rooms in our home, this one clearly made the most sense for the space I needed to film and create content.
However, I’m not a huge fan of these rooms mainly due to the weird and low ceilings in rooms like this one. They’re often used as an entertainment room or a playroom, so I spent a lot of time planning out how I wanted it to function as my office. In its current state, it had disgusting old carpet, blue walls, and textured ceilings.

The Ceilings
First course of action after replacing all of the carpet for these gorgeous wide oak plank hardwoods was to renovate the ceilings. Now popcorn ceilings are actually easy to remove and refinish, but we had stamped ceilings that were painted over, which made for really sharp and weird stalactites of paint from the ceiling. And because the ceilings are low and sloped, it really weighed this room down.
We did actually try to start the DIY process ourselves, and it was too much of a hassle than it was worth. I ended up hiring a contractor to do the job for us, who focuses solely on ceilings. It took 5 full days of worth to get the ceilings flat, so definitely worth hiring that out. It would have taken me months to get a perfect finish.

The Walls
Once the ceiling was done, we could finally move into the rest of the renovation. And since going through other projects in my home, I’ve really fallen in love with a more minimal design but injected with soft textures or gentle touches of color and I wanted to carry that through to this space. I am obsessed with the look of limewash and then discovered on all the environmental pros after the fact.
All of the walls got several coats of primer, so when I went to limewash, there wouldn’t be blue peeking through. Limewash will make you feel like an old European artist. You have to pretty flexible when it comes to limewash since it’s very different in color and look while wet. Have to trust it will all look good in the end. I actually stuck with one coat of limewash because I loved how much texture I got. If i wanted to go even more subtle, a second coat is recommended. But I love the texture and left it after the one coat.
What’s really cool are these paintable outlet covers. I limewashed these outlet covers to blend into the space, and I think it looks incredible.
The Closet
Now the closet. Big fan of organization, but the contractor wire shelves are not doing it. After removing the shelves and filling the gigantic holes these put in the walls, I settled on this semi-DIY closet organization. What I love about this system are the drawers. It’s a nice mix of shelving and drawers, which will be perfect for storing all my photo and video equipment. For a more custom look, I exchanged the hardware it came with with this brass hardware from Amazon.
Links
The Desk
Arguably the most important part of my office is my desk. I really wanted a desk that felt like it was made for this space. And now just like a desk that I bought and randomly stuck in a room. I thought the best course of action was to buy a butcher block counter top, install my own standing desk legs and cable management, and stain the top to my preferred color.
And I ran into a lot of issues.
I spent over three weeks trying to get the perfect neutral white oak look and the butcher block just pulled way too warm and yellow. I tried all the tricks with mixing paint to knock off the warmth, different stain combinations, a huge color wheel mess.
I just accepted defeat at that point and painted the entire desk black and was pretty disappointed with my setup. Several months later, still in the renovation process and I cam across the ergonofis desk system. Their alive desk, specifically, was exactly what I had envisioned for my desk, and so that was the desk I chose for my office space. Because I have a ton of files and documents too, I opted for the matching file cabinet to roll under my desk, and it turned into the perfect setup. And then I was able to repurpose my other desk for use in the garage!
It made the most sense to float my desk in the center of the room. I tried other configurations and they all felt kinda juvenile, never really felt or made sense for the space. And because I decided to float the desk, this means I have to get creative with cable management. The great thing about ergonofis was that they already included some cable management solutions with my desk system, but I also took to Amazon to shield and contain my cords with cable railways.
Links
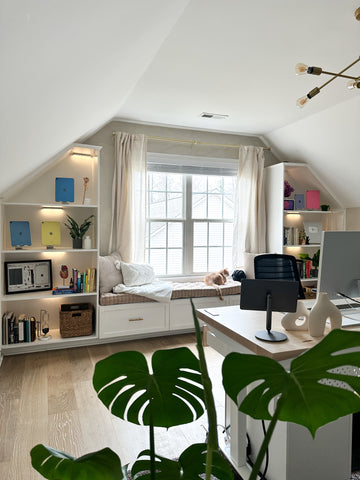
The Window Seat and Shelves
Now my favorite part of the studio and what took the longest to finish was the window seat and book shelves. Originally, we were going to do this ourselves. I hacked together some plans. Everything was working out with a bit of sweat and taking measurement after measurement. And then things went wrong.
I ordered my drawer boxes for the window seat online based on measurements I took from what we had already built, and they somehow ended up being the wrong sizes despite my taking multiple measurements and re-checking everything.
After taking the time to process those emotions of waiting on forever on something and it not working out, I decided to hire a carpenter to bring my ideas to life and make use of the drawer boxes that were the wrong sizes for my original build-out. The idea was to have a window seat with three drawers for storage and then two symmetrical bookshelves that go all the way to these sloped ceilings.

Links
- cushion
- wicker baskets
- plastic boxes (for cord organization)
- knot pillow
The Final Reveal
It took a really long time to finally come together and few final touches, but I’m obsessed with the final reveal.
The visions I had for this space came to life. It’s exactly how I envisioned, I am incredibly happy to come to this space everyday to work, get inspired, and connect with you and this community. There is still one more project I have left for this space, and that’s to refinish the closet doors to make them look more modern, but it’s not a high priority for me right now since I want to focus energy into other spaces in my home.
I will have links for everything in this space. I can’t wait to get to work. Until then, I’ll see you in the next one!

Share:
April iPad Plan with Me 2023
The iPad Mini as a Travel Companion